





Youtube and fb game no sound on Chrome
Technology Tutorials
Tuesday, November 13, 2012
why my chrome youtube cannot output the sound from speaker but ie can? why chrome you-tube can output sound from ear-phone only? what's wrong?
confirm is flash / shockwave problem d. Confirm not chrome setting problem d, because fb game and youtube and my flash animated all no sound, qvod player on chrome got sound.
Solution is at the picture below :

confirm is flash / shockwave problem d. Confirm not chrome setting problem d, because fb game and youtube and my flash animated all no sound, qvod player on chrome got sound.
Solution is at the picture below :

Internet speed is very slow? How to fix it?
Technology Tutorials
Thursday, October 06, 2011
Sometime the internet speed become very slow. You make the speed to faster back.
First you need to check the internet speed by follow 3 steps below :
1) Click Start Menu, type cmd into the search box. Press "Enter" button on keyboard.
2) You will see a small black box appear. Type ping www.google.com -t into the black box.
3) Check the time=??ms :
30ms = internet speed is very fast.
80ms = internet speed is fast.
300ms = internet speed is slow.
1000ms = internet speed is very slow.
2000ms = internet speed is very very very slow.
Picture below show the internet speed is VERY VERY VERY SLOW :
First you need to check the internet speed by follow 3 steps below :
1) Click Start Menu, type cmd into the search box. Press "Enter" button on keyboard.
2) You will see a small black box appear. Type ping www.google.com -t into the black box.
3) Check the time=??ms :
30ms = internet speed is very fast.
80ms = internet speed is fast.
300ms = internet speed is slow.
1000ms = internet speed is very slow.
2000ms = internet speed is very very very slow.
Picture below show the internet speed is VERY VERY VERY SLOW :
Best websites / players / softwares to watch latest movies
Technology Tutorials
Thursday, September 22, 2011
Do you want to watch latest cinema movie online?
1) PPStream - http://www.ppstream.com
2) Funshion - http://www.funshion.com
3) Xun Lei - http://www.xunlei.com
4) QVOD - qvodsou.cc | 33md.cc | tom365.com
Comparison between them :
PPStream :
1) PPStream doesn't has latest movie an anymore, it has outdated movie only.
2) PPStream will slow down your internet speed when you are downloading movie. (Solution to avoid PPStream slow down your internet at HERE).
3) If you use software to limit PPStream uploading speed to 3kbps just to avoid it slow down your internet speed, its downloading speed also will be slowed down so much (movie downloading speed become extremely slow).
Funshion :
1) Funshion has many latest movies.
2) Funshion will not slow down your internet speed when you are downloading movie.
3) Some user facing problem about Funshion website loading very slow until they can't open it and can't download funshion player from it, the here is the solution http://ye5.blogspot.com/2011/09/cannot-open-funshion-website-loading.html
Xun Lei:
1) Xun Lei is a software to download movie, not a software to play movie, but the installer of Xun Lei comes with Kan Kan player.
2) You can't watch the movie when the movie is downloading unless you pause / stop the downloading. (You can download three movies at the same times, so when watch 1 of the movie, u can still downloading other 2 movies).
3) Xun Lei has many errors. For example, 错误代码:0x8004022F(-2147220945). You can fix this error by the following steps :
Step 1) Unistall Xun Lei completely. After uninstall it, go to delete all files and folder of Xun Lei in Computer > C drive > Program Files.
Step 2) Download latest version of Xun Lei from http://www.xunlei.com.
Step 3) Install it.
Step 4) Try to open it and use it to play movie to check whether or not the error is fixed.
Reference at http://zhidao.baidu.com/question/108361952.html.
QVOD :
There are two different versions of QVOD player, tom365.com | 33md.cc are using the same QVOD player, but qvodsou.cc using other version of QVOD player. So if you want to watch movies on all the websites, you need to install both versions of QVOD. qvodsou.cc has many latest movies. After installing QVOD player onto your compter, you need to open those website by Internet Explorer, then right click the Active-X plugin at top bar there, choose allow Active-X, then only you can start downloading the movie.
If you have installed all the players onto your computers, just like me. Some of the player will downloading / uploading the movies secretely behind the scene, they will slow down your internet. If you are facing internet slow problem, you want to exit all those players, you need to exit the player 1 by 1 and you need to press CTRL + ALT + DELETE to bring up Task Manager, search for the players' process, end the process... There are so many steps and very inconvenient that you need to spend time do all the steps repeat and repeat again everyday. So I have create a program to exit all of them in 1 click. To create the program, please follow the steps below :
1) Open a notepad.
2) type the following words into the notepad :
taskkill /f /im ppstream.exe
taskkill /f /im ppsap.exe
taskkill /f /im ppap.exe
taskkill /f /im qvodplayer.exe
taskkill /f /im qvodterminal.exe
taskkill /f /im funshion.exe
taskkill /f /im funshionservice.exe
taskkill /f /im thunder.exe
taskkill /f /im thunderplatform.exe
3) Save the notepad (Choose All Files (*.*) at "Save as type :" field. Then type exitPlayers.bat at "File Name :" field. Then Choose Desktop as the saving location.
4) Everytime you want to exits all the players, you just need to double click exitPlayers.bat icon on your desktop.
1) PPStream - http://www.ppstream.com
2) Funshion - http://www.funshion.com
3) Xun Lei - http://www.xunlei.com
4) QVOD - qvodsou.cc | 33md.cc | tom365.com
Comparison between them :
PPStream :
1) PPStream doesn't has latest movie an anymore, it has outdated movie only.
2) PPStream will slow down your internet speed when you are downloading movie. (Solution to avoid PPStream slow down your internet at HERE).
3) If you use software to limit PPStream uploading speed to 3kbps just to avoid it slow down your internet speed, its downloading speed also will be slowed down so much (movie downloading speed become extremely slow).
Funshion :
1) Funshion has many latest movies.
2) Funshion will not slow down your internet speed when you are downloading movie.
3) Some user facing problem about Funshion website loading very slow until they can't open it and can't download funshion player from it, the here is the solution http://ye5.blogspot.com/2011/09/cannot-open-funshion-website-loading.html
Xun Lei:
1) Xun Lei is a software to download movie, not a software to play movie, but the installer of Xun Lei comes with Kan Kan player.
2) You can't watch the movie when the movie is downloading unless you pause / stop the downloading. (You can download three movies at the same times, so when watch 1 of the movie, u can still downloading other 2 movies).
3) Xun Lei has many errors. For example, 错误代码:0x8004022F(-2147220945). You can fix this error by the following steps :
Step 1) Unistall Xun Lei completely. After uninstall it, go to delete all files and folder of Xun Lei in Computer > C drive > Program Files.
Step 2) Download latest version of Xun Lei from http://www.xunlei.com.
Step 3) Install it.
Step 4) Try to open it and use it to play movie to check whether or not the error is fixed.
Reference at http://zhidao.baidu.com/question/108361952.html.
QVOD :
There are two different versions of QVOD player, tom365.com | 33md.cc are using the same QVOD player, but qvodsou.cc using other version of QVOD player. So if you want to watch movies on all the websites, you need to install both versions of QVOD. qvodsou.cc has many latest movies. After installing QVOD player onto your compter, you need to open those website by Internet Explorer, then right click the Active-X plugin at top bar there, choose allow Active-X, then only you can start downloading the movie.
If you have installed all the players onto your computers, just like me. Some of the player will downloading / uploading the movies secretely behind the scene, they will slow down your internet. If you are facing internet slow problem, you want to exit all those players, you need to exit the player 1 by 1 and you need to press CTRL + ALT + DELETE to bring up Task Manager, search for the players' process, end the process... There are so many steps and very inconvenient that you need to spend time do all the steps repeat and repeat again everyday. So I have create a program to exit all of them in 1 click. To create the program, please follow the steps below :
1) Open a notepad.
2) type the following words into the notepad :
taskkill /f /im ppstream.exe
taskkill /f /im ppsap.exe
taskkill /f /im ppap.exe
taskkill /f /im qvodplayer.exe
taskkill /f /im qvodterminal.exe
taskkill /f /im funshion.exe
taskkill /f /im funshionservice.exe
taskkill /f /im thunder.exe
taskkill /f /im thunderplatform.exe
3) Save the notepad (Choose All Files (*.*) at "Save as type :" field. Then type exitPlayers.bat at "File Name :" field. Then Choose Desktop as the saving location.
4) Everytime you want to exits all the players, you just need to double click exitPlayers.bat icon on your desktop.
Mobile phone connect to wifi but charge fee for gprs
Technology Tutorials
Tuesday, September 20, 2011
When you are connecting your mobile phone or handphone to wifi or wlan, you still get charged fee for gprs when you are :
1) browsing the website.
2) downloading java games or application.
3) download android games or application.
4) playing games.
Why this happen? It is because you didn't change GPRS to WIFI / WLAN in profiles settings yet, There are many profiles settings to be set :
1) Java setting,
2) Java games setting,
3) Service setting,
4) Browser setting,
5) Android app default setting,
6) Android games setting.
Different phone has different setting location, I give u example for my phone below :
To set java games : select game > options > receiver > java sim1 profile > WLAN
To set safari browser : safari > setting > profile > WLAN
After set all things from GPRS to Wifi / WLAN, you can test it by the following steps :
1) You can go to reset your gprs counter to 0. The gprs counter is on Call History for some mobile phone.
2) Try to online browse some website / download games / play game.
3) Check gprs counter.
Note that gprs delay to charge the fee. Last time I was stupid enough, I used my mobile phone browse website, download games, play games, then I go check my phone credit balance, the balance is still the same, so I though I was using wifi, and not using gprs. But on the next day, I checked my phone credit balance again, OMG! It charged RM25 for gprs! So if you want to check gprs charge, don't check with your credit balance, you can check with gprs counter.
1) browsing the website.
2) downloading java games or application.
3) download android games or application.
4) playing games.
Why this happen? It is because you didn't change GPRS to WIFI / WLAN in profiles settings yet, There are many profiles settings to be set :
1) Java setting,
2) Java games setting,
3) Service setting,
4) Browser setting,
5) Android app default setting,
6) Android games setting.
Different phone has different setting location, I give u example for my phone below :
To set java games : select game > options > receiver > java sim1 profile > WLAN
To set safari browser : safari > setting > profile > WLAN
After set all things from GPRS to Wifi / WLAN, you can test it by the following steps :
1) You can go to reset your gprs counter to 0. The gprs counter is on Call History for some mobile phone.
2) Try to online browse some website / download games / play game.
3) Check gprs counter.
Note that gprs delay to charge the fee. Last time I was stupid enough, I used my mobile phone browse website, download games, play games, then I go check my phone credit balance, the balance is still the same, so I though I was using wifi, and not using gprs. But on the next day, I checked my phone credit balance again, OMG! It charged RM25 for gprs! So if you want to check gprs charge, don't check with your credit balance, you can check with gprs counter.
Cannot open funshion website loading slow
Technology Tutorials
Tuesday, September 20, 2011
Funshion is so good but unfortunately some internet users might have some trouble to download Funshion player due to Funshion website server loading is too slow. If you are having this problem. Below is the solution steps :
1) Use Google DNS. The info of Google DNS at http://code.google.com/speed/public-dns/
2) Use Internet Explorer visit http://fs.funshion.com/download/.
3) Click on 新浪下载 to download Funshion player. If 新浪下载 server is too slow for u and fail to download it, then u should try click on 太平洋下载 or 腾讯下载 or ZOL下载 or 天空下载. You need to try 1 by 1 until you success download it. Be careful see the download button carefully, make sure you click the right button, see the picture below, most of people will click the first download button but it is actually a wrong button!!

4) If you have tried to download the player from all servers but none of them success, you can download it from my own hosting at http://2aek.com/inventory/funshion.exe which is 2.4.2.56 version only.
5) Install it.
6) Click "Play" button on the movie that you want to watch.
1) Use Google DNS. The info of Google DNS at http://code.google.com/speed/public-dns/
2) Use Internet Explorer visit http://fs.funshion.com/download/.
3) Click on 新浪下载 to download Funshion player. If 新浪下载 server is too slow for u and fail to download it, then u should try click on 太平洋下载 or 腾讯下载 or ZOL下载 or 天空下载. You need to try 1 by 1 until you success download it. Be careful see the download button carefully, make sure you click the right button, see the picture below, most of people will click the first download button but it is actually a wrong button!!

4) If you have tried to download the player from all servers but none of them success, you can download it from my own hosting at http://2aek.com/inventory/funshion.exe which is 2.4.2.56 version only.
5) Install it.
6) Click "Play" button on the movie that you want to watch.
Computer cannot connect to wireless network until restart the computer
Technology Tutorials
Saturday, September 17, 2011
Do you face this problem? When your computer is connecting to wireless network, suddenly it disconnected and cannot connect it back until you restart the computer. Actually you don't need to restart your computer:
If your computer can't find / can't detect / can't search / can't connect the wireless network, you can try to unplug the wireless adapter, then plug it to other usb port, then connect your computer to wirefless network.
If your computer can connect to wireless network, but cannot surf the internet, cannot browse website, then do the 5 steps below :
1) Right click on wireless icon,
2) Choose "Diagnose and Repair",
3) Choose "Restart DHCP".
4) It will take 10 seconds to restart DHCP,
5) Then you go to connect wireless again, it should work.
One of my friend said that when her laptop disconnected from wireless network, she was in the middle of something important so she cannot restart the computer, she need internet connection to save her works. She said she waited for 30 minutes later then only her laptop can connect back to the wireless network. So conclusion is there are 3 different solutions to solve this problem :
1) Restart computer / laptop,
2) Restart DHCP,
3) Wait for 30 minutes.
Obviously solution number 2 (Restart DHCP) is better than all of other.
If your computer can't find / can't detect / can't search / can't connect the wireless network, you can try to unplug the wireless adapter, then plug it to other usb port, then connect your computer to wirefless network.
If your computer can connect to wireless network, but cannot surf the internet, cannot browse website, then do the 5 steps below :
1) Right click on wireless icon,
2) Choose "Diagnose and Repair",
3) Choose "Restart DHCP".
4) It will take 10 seconds to restart DHCP,
5) Then you go to connect wireless again, it should work.
One of my friend said that when her laptop disconnected from wireless network, she was in the middle of something important so she cannot restart the computer, she need internet connection to save her works. She said she waited for 30 minutes later then only her laptop can connect back to the wireless network. So conclusion is there are 3 different solutions to solve this problem :
1) Restart computer / laptop,
2) Restart DHCP,
3) Wait for 30 minutes.
Obviously solution number 2 (Restart DHCP) is better than all of other.
Windows Vista / 7 / iphone cannot connect to wireless network which has password security? Resolved!
Technology Tutorials
Thursday, September 15, 2011
It is hard to connect wireless network that has password security on windows vista and windows 7 and iphone4.
For windows xp, just double click to connect the wireless, then type password can d, but for windows vista/7/iphone is NOT that easy!!!,
For windows xp, just double click to connect the wireless, then type password can d, but for windows vista/7/iphone is NOT that easy!!!,
Block computers in the same network open PPS
Technology Tutorials
Saturday, August 27, 2011
If there are 2 or more computers are sharing a modem or wireless router, if 1 of them open PPS, all other computer will suffer for internet slow speed. You can block pps by your wireless router, so none of computers can use pps, so your internet speed won't be slowed down. First, you need to have the router's login password.
Just block the following ports for both of TCP & UDP.
64430
17788
1900 *
8400
3478 *
8800 *
7201 *
7202 *
You can choose not block this ports above which have the sign of * because PPStream is more depends on port 17788, 8400 & 64430 only.

My router is Dlink Di-524, with an original firmware
Just block the following ports for both of TCP & UDP.
64430
17788
1900 *
8400
3478 *
8800 *
7201 *
7202 *
You can choose not block this ports above which have the sign of * because PPStream is more depends on port 17788, 8400 & 64430 only.
My router is Dlink Di-524, with an original firmware
How to fully exit PPS?
Technology Tutorials
Saturday, August 27, 2011
Do you realize that your internet is still slow after u close your PPS? It is because your PPS is still uploading and downloading the movie after you close PPS software, because you didn't close the PPS process yet. To close the process, follow the steps below :
1)press CTRL + ALT + Delete to open Task Manager,
2)click Process on top menu,
3)click Image Name to sort the name from A to Z (just for easy to find where is pps)
4)find PPSAP.exe then click it to select it,
5)click End Process.
If you feel it is inconvenient as you need to do the 5 steps above repeatedly everytime you want to off PPS. You can follow the step below to create a program :
1)open a notpad file,
2)type Taskkill /im ppsap.EXE /F onto the notpad,
3)press CTRL + S
4)change the field of Save as type: to All Files(*.*),
5)type offpps.bat on the field of File name:,
6)Choose location Desktop (To save the notepad file on your desktop).
If you want to close ppstream.exe, ppsap.exe and ppap.exe at the same time, you can modify step 2 above by typing :
taskkill /f /im ppstream.exe
taskkill /f /im ppsap.exe
taskkill /f /im ppap.exe
I have create 1 for myself, you can download it from http://2aek.com/inventory/offpps.bat.
Now everytime you want to off pps, you just need to double click the program that u have created. So convenient!
Many people misunderstand that after pressed “Stop” button to off the movie, then PPS will stop downloading, actually pps will still continue downloading and uploading!!!
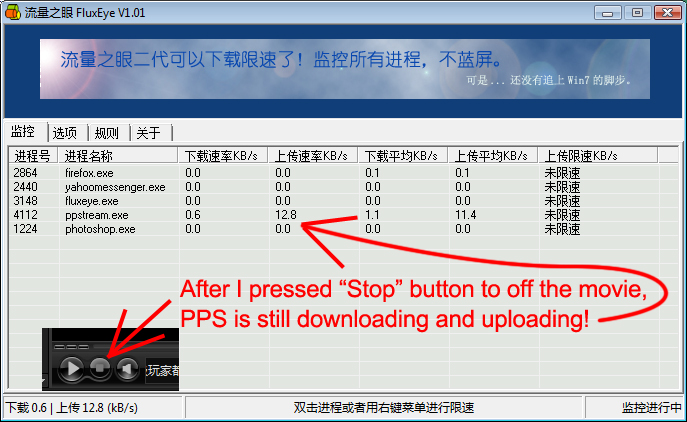
To check whether or not your PPS is stop uploading and downloading, you can download a software from http://2aek.com/inventory/donshare.rar or from http://cache.ourdev.cn/bbs_upload568426/files_10/ourdev_395773.rar. Then install it, then open it. (Tip : after you download the file, you need to open the file with 7zip or winzip or winrar).
You might also like : PPstream Slow Down Internet - Fixed | Block computers in the same network open PPS
1)press CTRL + ALT + Delete to open Task Manager,
2)click Process on top menu,
3)click Image Name to sort the name from A to Z (just for easy to find where is pps)
4)find PPSAP.exe then click it to select it,
5)click End Process.
If you feel it is inconvenient as you need to do the 5 steps above repeatedly everytime you want to off PPS. You can follow the step below to create a program :
1)open a notpad file,
2)type Taskkill /im ppsap.EXE /F onto the notpad,
3)press CTRL + S
4)change the field of Save as type: to All Files(*.*),
5)type offpps.bat on the field of File name:,
6)Choose location Desktop (To save the notepad file on your desktop).
If you want to close ppstream.exe, ppsap.exe and ppap.exe at the same time, you can modify step 2 above by typing :
taskkill /f /im ppstream.exe
taskkill /f /im ppsap.exe
taskkill /f /im ppap.exe
I have create 1 for myself, you can download it from http://2aek.com/inventory/offpps.bat.
Now everytime you want to off pps, you just need to double click the program that u have created. So convenient!
Many people misunderstand that after pressed “Stop” button to off the movie, then PPS will stop downloading, actually pps will still continue downloading and uploading!!!
To check whether or not your PPS is stop uploading and downloading, you can download a software from http://2aek.com/inventory/donshare.rar or from http://cache.ourdev.cn/bbs_upload568426/files_10/ourdev_395773.rar. Then install it, then open it. (Tip : after you download the file, you need to open the file with 7zip or winzip or winrar).
You might also like : PPstream Slow Down Internet - Fixed | Block computers in the same network open PPS
Format PC in 20 minutes! Super Fast!
Technology Tutorials
Tuesday, June 21, 2011
Normally people format a computer need to take about 3 to 5 hours because they need to redownload drivers and softwares, and need to reinstall the softwares.
Actually we can skip all steps by using a software call Acronis. Basically you just need to copy your entire c drive and paste it into a external harddisk. So next time when you format your computer, you can copy the c drive from external harddisk to your computer harddisk, so you don't need to resintall all the drivers and softwares.
Step 1 - Format ur pc (jz to make sure no virus and rubbish).
Step 2 - Install all drivers and softwares.
Step 3 - Test to use all software (make sure no error, and no virus, make sure everything is okay).
Step 4 - Download and install Acronis free trial version.
Step 5 - Open Acronis, insert an empty cd, click "make bootable media". It will burn some data into the empty cd.
Step 6 - Take out the cd. Plug in External Harddisk. Open Acronis, click "Backup partition", follow the process to backup your c drive into External Harddisk.
Next time when you want to format your computer, follow the steps below :
Step 1 - Insert windows cd (vista/xp/7), delete all partitions (c drive & d drive). DO NOT create new partitions, and DO NOT format partition yet.
Step 2 - take out windows cd, and insert Acronis bootable media cd.
Step 3 - Restart Computer, it will boot into Acronish software.
Step 4 - Click "Create New Partition" to create a new partition, it will be your C drive.
Step 5 - Click "Restore a Partition" to copy the old c drive from your external harddisk to your current fresh new partition.
Step 6 - Wait for 15 to 30 minutes to let it finish copying. Then take out the cd and WOW!! You got everything back. Now you just need to upgrade those outdated software like msn messenger, firefox browser...
Actually we can skip all steps by using a software call Acronis. Basically you just need to copy your entire c drive and paste it into a external harddisk. So next time when you format your computer, you can copy the c drive from external harddisk to your computer harddisk, so you don't need to resintall all the drivers and softwares.
Step 1 - Format ur pc (jz to make sure no virus and rubbish).
Step 2 - Install all drivers and softwares.
Step 3 - Test to use all software (make sure no error, and no virus, make sure everything is okay).
Step 4 - Download and install Acronis free trial version.
Step 5 - Open Acronis, insert an empty cd, click "make bootable media". It will burn some data into the empty cd.
Step 6 - Take out the cd. Plug in External Harddisk. Open Acronis, click "Backup partition", follow the process to backup your c drive into External Harddisk.
Next time when you want to format your computer, follow the steps below :
Step 1 - Insert windows cd (vista/xp/7), delete all partitions (c drive & d drive). DO NOT create new partitions, and DO NOT format partition yet.
Step 2 - take out windows cd, and insert Acronis bootable media cd.
Step 3 - Restart Computer, it will boot into Acronish software.
Step 4 - Click "Create New Partition" to create a new partition, it will be your C drive.
Step 5 - Click "Restore a Partition" to copy the old c drive from your external harddisk to your current fresh new partition.
Step 6 - Wait for 15 to 30 minutes to let it finish copying. Then take out the cd and WOW!! You got everything back. Now you just need to upgrade those outdated software like msn messenger, firefox browser...
How to faster Facebook loading speed?
Facebook,
Technology Tutorials
Wednesday, March 16, 2011
If you are having difficulty accessing facebook. Why Facebook slow? It is because of the earthquake in Japan on 11 March 2011 damaged the cable that link Malaysia to Hongkong to USA. Click here for more info.
Solution :
You can force your computer to use another Malaysia ISP ip address 203.106.85.66 to load your facebook faster. You just need to follow the step below :
1. Go to C:\Windows\System32\drivers\etc\
2. Open "hosts" file with notepad
3. Add 203.106.85.66 www.facebook.com onto the notepad.
4. Save.
5. Close your browser. (Press CTRL + ALT + Delete button on your keyboard to bring up Task Manager, select Firefox or Chrome or IE, then click "End Task").
6. Open your browser, sign in facebook.com
7. Enjoy the superfast loading speed of facebook.com! YEAH!
Solution :
You can force your computer to use another Malaysia ISP ip address 203.106.85.66 to load your facebook faster. You just need to follow the step below :
1. Go to C:\Windows\System32\drivers\etc\
2. Open "hosts" file with notepad
3. Add 203.106.85.66 www.facebook.com onto the notepad.
4. Save.
5. Close your browser. (Press CTRL + ALT + Delete button on your keyboard to bring up Task Manager, select Firefox or Chrome or IE, then click "End Task").
6. Open your browser, sign in facebook.com
7. Enjoy the superfast loading speed of facebook.com! YEAH!
Paypal Fail To Send Payment By Maybank Debit Card
Technology Tutorials
Friday, February 25, 2011

After you link your Maybank Treats Smart Shopping Visa debit card to your Paypal, when you are about sending payment to other's paypal account by using your debit card, if Paypal shows any error messages below :
1) Please finish the card confirmation process first, then try this payment again. This error occur is because you recently edit/update the info of your card, so Paypal need a day to review your card. For my case, this error is fixed on the next morning I woke up.
External Hard Disk suddenly cannot open - Fixed
Technology Tutorials
Wednesday, February 23, 2011
Your external hard disk was working very good all the times but suddenly you can't open it anymore, when you are trying to open it, it give the error message "You need to format disk in drive before you can use it", and your hard disk is 0 byte, means there is no file inside the hard disk. Means all the data inside the hard disk are gone!!!
Reason :
1) The external hard disk lost power while you are copying a file onto it.
2) The external hard disk usb cable was unplugged while transferring data.
Solution :
Please follow the steps at below :
1) Click the Safely Remove Hardware icon at the bottom right corner near the clock/time area on your desktop to safely remove your external hard disk.
Reason :
1) The external hard disk lost power while you are copying a file onto it.
2) The external hard disk usb cable was unplugged while transferring data.
Solution :
Please follow the steps at below :
1) Click the Safely Remove Hardware icon at the bottom right corner near the clock/time area on your desktop to safely remove your external hard disk.
How To Export Firefox Extensions
Technology Tutorials
Sunday, February 20, 2011
If you are using two computers and if you want to export / copy / transfer / send the Firefox extensions from 1 computer to other computer, you can follow the following steps :
1) Download and install FEBE extension to your Firefox.
2) Restart your Firefox.
3) On your Firefox, click Tools > FEBE > FEBE Options > Directory > Change the directory to your desktop, so that all the extension backup files will be saved on your desktop later.
4) On your Firefox, click Tools > FEBE > Perform Backup.
5) Now you see all the extension backup files are on your desktop.
6) Send all the extensions backup files to your other computer.
7) Open Firefox on your other computer, click File, click Open File, select the extension backup file.
Note that you must open 1 by 1 of the extension backup file to restore all the extensions onto the Firefox of other computer. If you have more than 30 extensions backup files, you will need to repeat the same tasks for 30 times!!! It is very inconvenient. Actually you can use a software to combine all the 30 extension backup files into 1 backup file. Steps :
1) Download and install CLEO extension to your Firefox.
2) Restart your Firefox.
3) On your Firefox, click Tools > FEBE > CLEO > CLEO Options > Directory > Change the directory to your desktop, so that the extension backup files will be saved on your desktop later.
4) On your Firefox, click Tools > FEBE > Create Cleopack > Select items to package > Select all the extension backup files that you have created by FEBE just now.
5) Now you see the cleopack file is on your desktop.
6) Send the cleopack file to your other computer.
7) Open Firefox on your other computer, click File, click Open File, select the cleopack file.
1) Download and install FEBE extension to your Firefox.
2) Restart your Firefox.
3) On your Firefox, click Tools > FEBE > FEBE Options > Directory > Change the directory to your desktop, so that all the extension backup files will be saved on your desktop later.
4) On your Firefox, click Tools > FEBE > Perform Backup.
5) Now you see all the extension backup files are on your desktop.
6) Send all the extensions backup files to your other computer.
7) Open Firefox on your other computer, click File, click Open File, select the extension backup file.
Note that you must open 1 by 1 of the extension backup file to restore all the extensions onto the Firefox of other computer. If you have more than 30 extensions backup files, you will need to repeat the same tasks for 30 times!!! It is very inconvenient. Actually you can use a software to combine all the 30 extension backup files into 1 backup file. Steps :
1) Download and install CLEO extension to your Firefox.
2) Restart your Firefox.
3) On your Firefox, click Tools > FEBE > CLEO > CLEO Options > Directory > Change the directory to your desktop, so that the extension backup files will be saved on your desktop later.
4) On your Firefox, click Tools > FEBE > Create Cleopack > Select items to package > Select all the extension backup files that you have created by FEBE just now.
5) Now you see the cleopack file is on your desktop.
6) Send the cleopack file to your other computer.
7) Open Firefox on your other computer, click File, click Open File, select the cleopack file.
Faster Your Computer / Laptop performance
Technology Tutorials
Saturday, February 19, 2011
1) Remove spyware, and help protect your computer from viruses.
2) Free up disk space by using Disk Cleanup to:
* Remove temporary Internet files.
* Delete downloaded program files, such as Microsoft ActiveX controls and Java applets.
* Empty the Recycle Bin.
* Remove Windows temporary files, such as error reports.
* Delete optional Windows components that you don't use.
* Delete installed programs that you no longer use.
* Remove unused restore points and shadow copies from System Restore.
To open Disk Cleanup = Click Start, click All Programs, click Accessories, click System Tools, and then click Disk Cleanup.
3) Speed up data access by using Defragment.
Run Disk Defragmenter once a week, there are other times you should run it, too, such as when :
* You add a large number of files.
* Your free disk space totals 15 percent or less.
* You install new programs or a new version of the Windows operating system.
To open Defragment = click All Programs, click Accessories, click System Tools, and then click Disk Defragmenter.
4) Repair disk errors by using Error Checking utility.
If you use your computer daily, you should run this utility once a week to help prevent data loss. To open Error Checking Utility = Go to my computer > right click on the c or d drive > properties > tools > error checking.
5) ReadyBoost (only for Vista and Windows 7).
You can use ReadyBoost to speed up your system. It is a new concept in adding memory to a system. Windows ReadyBoost can use storage space on some removable media devices, such as USB flash drives, to speed up your computer. When you insert a device with this capability, the AutoPlay dialog will offer you the option to speed up your system using Windows ReadyBoost. If you select this option, you can then choose how much memory to use for this purpose. However, there are some situations where you may not be able to use all of the memory on your storage device to speed up your computer.
Some universal serial bus (USB) storage devices contain both slow and fast flash memory, and Windows can only use fast flash memory to speed up your computer. So if your device contains both slow and fast memory, keep in mind that you can only use the fast memory portion for this purpose.
The recommended amount of memory to use for Windows ReadyBoost acceleration is one to three times the amount of random access memory (RAM) installed in your computer. For instance, if your computer has 512 megabytes (MB) of RAM and you plug in a 4 gigabyte (GB) USB flash drive, setting aside from 512 MB to 1.5 GB of that drive will offer the best performance boost. The minimum size for any USB flash drive to work with Windows ReadyBoost is 256 MB.
You can enable or disable Windows ReadyBoost for a specific flash drive or other removable storage device. Steps :
# Plug a flash drive or other removable media device into your computer. This should automatically open AutoPlay (You must turn on AutoPlay feature on your windows to do that).
# Under General Options, click Speed up my system. This will display the Properties dialog box for your flash drive or other removable media device.
# Click the ReadyBoost tab, and then do one of the following:
* To turn ReadyBoost off, click Do not use this device.
* To turn ReadyBoost on, click Use this device, and then move the slider to choose how much of the available space on your flash drive you want to reserve for boosting your system speed.
# Click OK.
2) Free up disk space by using Disk Cleanup to:
* Remove temporary Internet files.
* Delete downloaded program files, such as Microsoft ActiveX controls and Java applets.
* Empty the Recycle Bin.
* Remove Windows temporary files, such as error reports.
* Delete optional Windows components that you don't use.
* Delete installed programs that you no longer use.
* Remove unused restore points and shadow copies from System Restore.
To open Disk Cleanup = Click Start, click All Programs, click Accessories, click System Tools, and then click Disk Cleanup.
3) Speed up data access by using Defragment.
Run Disk Defragmenter once a week, there are other times you should run it, too, such as when :
* You add a large number of files.
* Your free disk space totals 15 percent or less.
* You install new programs or a new version of the Windows operating system.
To open Defragment = click All Programs, click Accessories, click System Tools, and then click Disk Defragmenter.
4) Repair disk errors by using Error Checking utility.
If you use your computer daily, you should run this utility once a week to help prevent data loss. To open Error Checking Utility = Go to my computer > right click on the c or d drive > properties > tools > error checking.
5) ReadyBoost (only for Vista and Windows 7).
You can use ReadyBoost to speed up your system. It is a new concept in adding memory to a system. Windows ReadyBoost can use storage space on some removable media devices, such as USB flash drives, to speed up your computer. When you insert a device with this capability, the AutoPlay dialog will offer you the option to speed up your system using Windows ReadyBoost. If you select this option, you can then choose how much memory to use for this purpose. However, there are some situations where you may not be able to use all of the memory on your storage device to speed up your computer.
Some universal serial bus (USB) storage devices contain both slow and fast flash memory, and Windows can only use fast flash memory to speed up your computer. So if your device contains both slow and fast memory, keep in mind that you can only use the fast memory portion for this purpose.
The recommended amount of memory to use for Windows ReadyBoost acceleration is one to three times the amount of random access memory (RAM) installed in your computer. For instance, if your computer has 512 megabytes (MB) of RAM and you plug in a 4 gigabyte (GB) USB flash drive, setting aside from 512 MB to 1.5 GB of that drive will offer the best performance boost. The minimum size for any USB flash drive to work with Windows ReadyBoost is 256 MB.
You can enable or disable Windows ReadyBoost for a specific flash drive or other removable storage device. Steps :
# Plug a flash drive or other removable media device into your computer. This should automatically open AutoPlay (You must turn on AutoPlay feature on your windows to do that).
# Under General Options, click Speed up my system. This will display the Properties dialog box for your flash drive or other removable media device.
# Click the ReadyBoost tab, and then do one of the following:
* To turn ReadyBoost off, click Do not use this device.
* To turn ReadyBoost on, click Use this device, and then move the slider to choose how much of the available space on your flash drive you want to reserve for boosting your system speed.
# Click OK.
BT-250 Driver Is Not Found
Technology Tutorials
Sunday, February 13, 2011
BT-250 is bluetooth device. I guess you did install the bluetooth driver already, but when you on the bluetooth device, is show "Found a new device" and still asking you to install the driver again.
Reason
It was because you off the bluetooth device when you are installing the driver.
Solution
You must on the bluetooth device first, then you install the driver.
For my case, I just bought Asus EEE PC Touch T91, I format it and install XP Pro 86bit version, I though the bluetooth driver is support 32bit and 64bit windows only, so I went to google search for 86bit version of driver, but I can't find it. Then I read the instruction of installing the bluetooth driver, then only I realize that actually I need to on the bluetooth device before I installing its driver. Haha.
Reason
It was because you off the bluetooth device when you are installing the driver.
Solution
You must on the bluetooth device first, then you install the driver.
For my case, I just bought Asus EEE PC Touch T91, I format it and install XP Pro 86bit version, I though the bluetooth driver is support 32bit and 64bit windows only, so I went to google search for 86bit version of driver, but I can't find it. Then I read the instruction of installing the bluetooth driver, then only I realize that actually I need to on the bluetooth device before I installing its driver. Haha.
Cannot Download Msn / Windows Live Messenger / Cannot Open Microsoft Website / Cannot Install IE
Technology Tutorials
Thursday, February 10, 2011
If you are facing the problems that shown below :
1 - You want to download some software from Microsoft website, but when you click "download" button, the Microsoft website suddenly show the error "page not found".
2 - You want to download windows live messenger, but when you click the "download" button, the website suddenly show the error "page not found".
3 - Cannot install new version of Internet Explorer such as IE 8 or IE 9.
solution - Please follow the steps below :
1) Goto Start menu or click "Windows" button on your keyboard
2) Click "Run" (for xp). Skip this step if you are using Vista.
3) Type Services.msc in the Run box / search box.
4) Right click on DNS Client.
5) Choose Stop.
Done!!! You can go try to download the software from Microsoft website or try to download windows live messenger now. Good luck!!
You might also like this : If cannot sign in msn, solution here!
1 - You want to download some software from Microsoft website, but when you click "download" button, the Microsoft website suddenly show the error "page not found".
2 - You want to download windows live messenger, but when you click the "download" button, the website suddenly show the error "page not found".
3 - Cannot install new version of Internet Explorer such as IE 8 or IE 9.
solution - Please follow the steps below :
1) Goto Start menu or click "Windows" button on your keyboard
2) Click "Run" (for xp). Skip this step if you are using Vista.
3) Type Services.msc in the Run box / search box.
4) Right click on DNS Client.
5) Choose Stop.
Done!!! You can go try to download the software from Microsoft website or try to download windows live messenger now. Good luck!!
You might also like this : If cannot sign in msn, solution here!
Cannot Format Pendrive? Use This Software.
Technology Tutorials
Friday, February 04, 2011
Your pendrive cannot be formatted? You can download a software to format your pendrive. Instruction steps :
1 - Click here to download the software in zip file format.
2 - Use 7zip or Winrar or Winzip to open it.
3 - Copy the SP27608.exe file to your pendrive.
4 - Double click on the SP27608.exe file in your pendrive to install it to your C: drive in your computer.
5 - On your computer, open/run the software to format your pendrive. (Don't choose quick format).
I did try to use this software to format my 64gb and 32gb pendrives, and it works!!! Hopefully it works for your pendrive.
1 - Click here to download the software in zip file format.
2 - Use 7zip or Winrar or Winzip to open it.
3 - Copy the SP27608.exe file to your pendrive.
4 - Double click on the SP27608.exe file in your pendrive to install it to your C: drive in your computer.
5 - On your computer, open/run the software to format your pendrive. (Don't choose quick format).
I did try to use this software to format my 64gb and 32gb pendrives, and it works!!! Hopefully it works for your pendrive.
Fix WAMPserver or XAMPP Localhost Shows Blank Page
Technology Tutorials
Sunday, January 02, 2011
 Fix the problem of Wamp Server or XAMPP Localhost Shows Blank Page!!! After installed WAMP Server / XAMPP, if you have such errors like :
1 - localhost shows blank page.
2 - localhost and phpmyadmin page giving empty body.
3 - Your port 80 is actually used by Server Platinum ...
4 - The service has not been started.
5 - localhost is not working.
6 - wamp / apache server could not start.
PPstream Slow Down Internet - Fixed
Internet,
Technology Tutorials
Friday, December 31, 2010
 Did you realize that your Internet speed becomes very slow when you are opening ppstream or µTorrent or BitComet or eMule, or TVUplayer or TVants or PPLive or ppfilm? Do you want to fix this problem? There are 3 different solutions :
Solution 1 :
Download the latest version of Half-open limit fix software. After finish download, you open it and click "Add to tcpip.sys" button. Then Restart pc. That's all ! So easy ! Wow


